Wednesday, April 25, 2012

Tin-foil Grilled Tilapia

Okay so this by far is one of my favorite recipes ever ever ever. I'm serious, these little "packages of love" are aaaamazing and since summertime is just around the corner, that means the weather is nice enough to start up the grill and make this meal as much as I want. :)

Summertime to me is sitting out on my deck with the sun setting behind the pine trees, enjoying the sweet, warm air with my family and friends.  It is when the fireplace is going, music is playing, and there is that mouth-watering smell in the air of something delicious on the BBQ.   

This tilapia IS what you want on your BBQ on those summer nights.  It is so juicy and packed with so much flavor, that you will fall in love with it as much as I have. (Plus they are light and healthy too!)  By wrapping the fish and veggies in tinfoil, the fish cooks perfectly through and the vegetables carmalize oh so sweetly.  These little "presents"are super easy to make, super quick to cook, and absolutely perfect to enjoy on those nice summer evenings.


Ingredients:
4 tilapia fillets
3 small sweet yellow onions, sliced
1 bag baby carrots, halved lengthwise
1-2 bunches asparagus, par-cooked and chopped
2 TBS butter
Kosher salt and pepper, to taste

Direction:
Turn on grill.  Put asparagus in glass bowl with a small amount of water and cover it with a wet paper towel.  Microwave 4-5 minutes.  Cool.  Chop all vegetables, as seen above in picture.  Set aside.  Lay out four long pieces of aluminum foil and spray with non-stick cooking spray.  Place a fish fillet on each piece of foil.  Sprinkle with salt and pepper.  Divide the veggies up evenly on top of the tilapia fillets.  Make sure to use all of the veggies- it may look like a lot, but believe me, you will want a lot! Sprinkle veggies with salt and pepper.  Cut up butter into tiny cubes or slices and place sporadically on the fish- divide the butter up evenly, about each fish getting 1/2 TBS worth.  (Look closely at pictures, you will see the butter on top of the veggies!)


To make package: fold long side of aluminum foil in, first.


Next, fold in one side of the foil then the next, wrapping fish in tightly.  Make sure there are no openings in the foil.  Fish and veggies should NOT be showing- this way the fish cooks and the juice stays inside the package.  Do this for each package.


Place fish packages on grill.  Grill package for 7-10 minutes, then flip and cook for another 7-10 minutes.  Once done, carefully open up your tiny package of deliciousness, and ENJOY! xx


Monday, April 23, 2012

Summer Berry Pie

There is no better feeling than being able to pull out my summer sundresses, bikinis, and flip flops.  

Okay so it may be only April, but the sun has been out for the past couple days and it is making me feel like Summer is finally here.  A girl can dream, right?

Nothing screams summer to me more than juicy, sweet, suckling berries.  This pie does the trick on those hot summer days when you need something sweet and refreshing.  Now, I know the tempting word "pie" isn't exactly what you want to hear during bikini season, but I promise this pie is so light it will leave you feeling like you actually did something good for your body.  ( I mean, it does provide you with your daily serving of fruit...) 

This pie will satisfy any adult or child cravings by the pool or indoors while you escape the heat.  It gives you all of the summer flavors packed in one delicous bite.  So let's bring on the sunshine and summer festivities with this sweet summer berry pie!


Ingredients:
1 cup strawberries, sliced
1 cup blueberries
1 cup raspberries (we used frozen but if they are available fresh- use fresh!)
1 package raspberry or strawberry jello
3/4 cup granulated sugar
3 TBS cornstarch
1 1/2 cups water
1 low-fat graham cracker crust
1 container light cool whip

Directions:
Slice strawberries and put rest of fruit aside.  In a saucepan, add sugar and cornstarch and mix.  Slowly add water until smooth.  Heat over medium heat and bring to a bowl stirring consistently.  Once mixture is brought to a boil, boil for one minute then remove from heat.  The mixture will become thick. 


 Add jello mix and stir until dissolved.  Bring to room temperature.

Once cooled, add berries and gently stir to combine with jello.


 Pour into crust and refrigerate for at least 3 hours.


Before serving, top pie with cool whip.


Slice and serve with fresh fruit. Enjoy!!


Thursday, April 19, 2012

Three Cheese Baked Mostaccioli

My best friend has an obsession with cheese.  She doesn't care what kind it is- she will inhale the whole platter, before you can even get out the crackers.  Literally- she could probably eat a whole wheel of cheese in one sitting.  The girl loves cheese, I think, more than she loves me.

Anyways- back to the food- her love for cheese inspired me to make this ooey gooey three cheese baked pasta.  I mean that is what best friends are for, right?  Inspiring you to make the best pasta dish around.

There is cheese found everywhere throughout the dish; in the sauce, deep in the noodles, and even on top creating a crunchy, crispy crust.  I ditched the meat in this dish, since my best friend is a vegetarian, but feel free to add whatever pleases you.  I highly recommend making this cheesy, scrumptious meal.  It is probably one of the easiest pasta dishes to make and will please any of your cheese-lovers.  So c'mon, say "More cheese please" and go indulge!


Ingredients:
2 cloves garlic, minced
1 small yellow onion, diced
1 bag mostaccioli
1 cup Parmesan cheese, shredded
1 cup Mozzarella cheese, shredded
1 cup Ricotta cheese
2 jars favorite tomato sauce
Kosher salt, to taste

Directions:
Bring a pot of water to a boil.  Once boiling, pour in mostaccioli noodles and cook until al dente or tender to the bite.  In a saute pan, heat olive oil and add onions.  Cook for about 3 minutes then add garlic.  Saute until onion is translucent and cooked through.  Set aside.


Add onion and garlic mix to a large bowl.  Once noodles are cooked through, drain and add to bowl.  Pour in both jars of sauce and kosher salt.  Add Mozzarella, leaving about 1/4 cup for top of pasta.  Add a couple pinches of Parmesan and blot ricotta into bowl, again leaving cheese to top the dish off with.  (You may not want to use all of the Ricotta- but add as much as you would like.)  Mix together so noodles are coated in cheese, sauce, and onion mixture. (It ain't pretty but pictured below is what it should look like.)


Pour into a greased baking dish.  Top with remaining Mozzarella, Parmesan, and blot some more Ricotta on top.  (Again, add as much cheese as you would like, you don't have to use all of it if you think it is too much! But remember, we like it cheesy! :) )


Bake at 350 F for about 20 minutes.  After it has been cooking for 20 minutes and is hot and bubbling, turn on the broiler and let the cheese become melted and crispy to create that delicious crust on the top.
MMM... wait until you have this in front of you.. believe me, you will be going back for seconds... or sixths. ;)

Friday, April 13, 2012

Chicken Tacos

The other night I thought it would be a good idea to have a fiesta.

Believe me, it was the best idea I have had in a long time.

Lets just say, I thoroughly enjoyed myself by stuffing my face with all of the delicious food that surrounded me.  One of those tasty foods being my tacos.  Now everyone likes a good taco, but these are something else.  They have all of the qualities of a perfect taco.  The crispy tortilla, the juicy meat, the fresh toppings- I promise, it will be hard to only eat one.

These tacos may look like hard work, but honestly, I think my dog could make them.  Okay, that might be a little exaggerated, but really.  They are so easy to make and so worth it.

So, go buy some tequila now and call it an excuse to throw a fiesta tonight.  I promise, you'll be thanking me.


Ingredients:
4 large chicken breasts, poached and shredded
1 can low sodium chicken broth
1 1/2 TBS worcestershire sauce
2 cups low fat orange juice
2 tsp cumin
5 peppers in adobo sauce
6 cloves garlic, chopped
4 cups cilantro, chopped
kosher salt, to taste
Tortillas

Toppings for tacos: (Optional)
My Guacamole
My Pico De Gallo
Low fat sour cream
Shredded cheddar cheese

Directions:
To poach the chicken, place chicken breasts in a single layer in a pot. Pour chicken broth over the breasts, covering just until all breasts are submerged in liquid.  Bring to a boil, then reduce to a simmer for about 20-30 min until cooked through.


Once cooked through, place on plate and shred chicken breasts.


Set aside.  In a blender, add worcestershire sauce, orange juice, cumin, peppers in adobo sauce, garlic, cilantro and salt and blend.  Make sure every ingredient has blended thoroughly.


Add chicken to a large dutch pan and pour marinade over chicken.  Stir until all chicken is coated with marinade.  Heat chicken over medium heat until hot.  


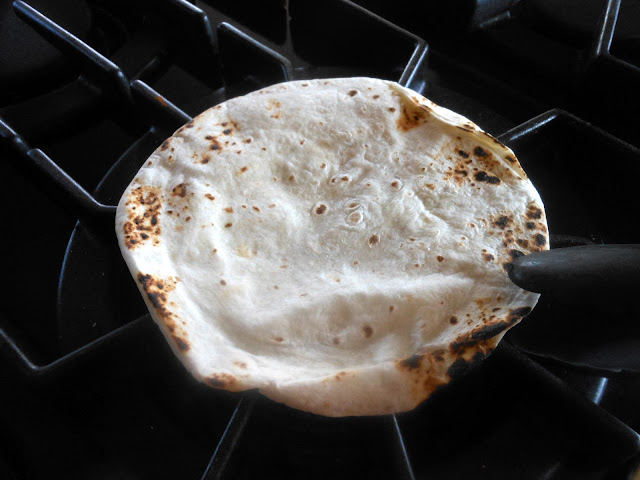
Take a tortilla and crisp both sides over high heat on stove top.  With open burners like this, they burn quick so watch very carefully.


To assemble, what I claim to be, the perfect taco, spread my guacamole all over the warm, crispy shell.  Next, I add a liberal amount of chicken over the guac.  Then, I top fresh pico de gallo, cheddar cheese, and sour cream over the chicken.  Wallah! The perfect taco!


Fresh Homemade Pico De Gallo

Nothing is better on top of a taco or on top of salty chip than fresh pico de gallo.  This pico de gallo beats any prepackaged salsa.  With its sweet, fresh flavors, this recipe brightens any meal.  With only a few ingredients, it is so worth making.  Don't skip out on it!


Ingredients:
7 plum tomatoes, chopped
1/4 cup cilantro, chopped 
1/2 red onion, chopped
2 limes, juiced
kosher salt, to taste

Directions: 
Chop tomatoes, onion, and cilantro and add to serving bowl.  Add lime juice and salt and mix.  Refrigerate so flavors marry and pico becomes juicy.  Serve and enjoy! 


Thursday, April 12, 2012

Homemade Guacamole

So this guacamole is literally the best guacamole out there.  I'm not just saying that 'cause it is my own recipe, I'm serious people, it is THE BEST. Every time I go to a mexican restaurant I order guacamole, you know, to compare mine to theirs.  To my disappointment, it is either flavorless, too mushy, or just plain and boring.  My guacamole, on the other hand, is FULL of flavor, chunky, and absolutely delicious.  With only a couple ingredients, it is one of the best apps you can put out on the table.  ENJOY!

Ingredients:
9 avocados, pitted and mashed
3 cloves of garlic, minced
1 bunch of cilantro, chopped
1/2 red onion, diced
2 limes, juiced 
1 jalapeno, seeded and chopped (optional- I did not use one this time)
Kosher salt and pepper, to taste

Directions:
In a bowl, take the flesh out of all of the avocados and mash together with a fork, keeping the avocados chunky.  


Add the garlic, cilantro, onion, jalapeno and lime juice to the avocados.  Mix together, keeping the guacamole chunky.  Add salt and pepper to taste.  Once the guac is to your liking, cover with saran wrap and press the saran wrap down so it touches the guacamole.  You do not want any air between the wrap and guac.  This will keep it from not turning brown.  Refrigerate to chill, then serve and enjoy!


(The best thing about this guac is you can add whatever you want to it- if you like it spicy, add more peppers if you want it with tomatoes, add some! This is your turn to be your own chef and the possibilities are endless!) ENJOY!